Linux 安装 nginx
# Linux 安装 nginx
# nginx 常用命令
# 查看Nginx进程是否启动
ps -ef | grep nginx

# 打开配置文件
vi /usr/local/nginx/conf/nginx.conf

# 命令 适用于手动安装方式
# 进入 cd /usr/local/nginx/sbin

# 启动
./nginx

# 关闭
./nginx -s stop

# 重启
./nginx -s reload
# 一、 Yum 安装
nginx 官网安装说明 (opens new window)
# (一)安装
设置 yum 存储库
vim /etc/yum.repos.d/nginx.repo
在第一步生成的文件中填入一下内容
[nginx]
name=nginx repo
baseurl=http://nginx.org/packages/centos/7/$basearch/
gpgcheck=0
enabled=1
安装 nginx
yum install nginx
查看 nginx 安装目录
rpm -ql nginx
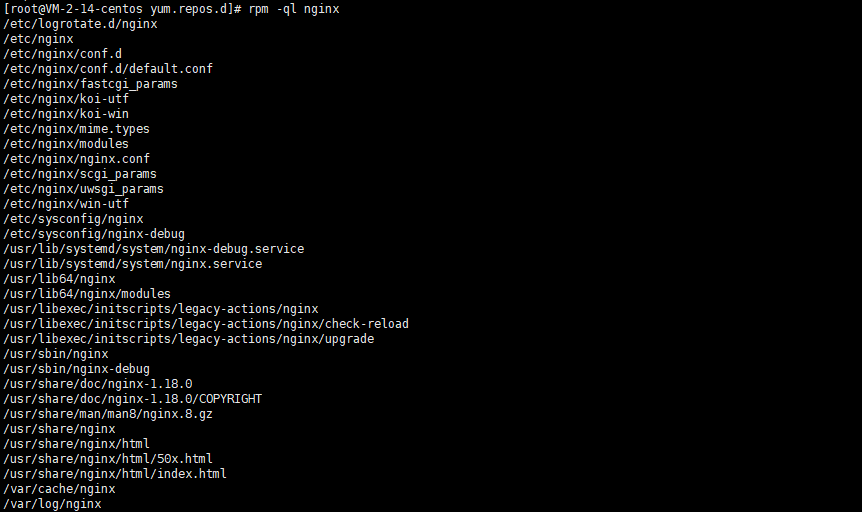
从上图可看出此方法安装的 nginx 文件存放较为分散。
如果想要 nginx 文件集中在一起,可使用下一种手动安装方式
# (一)卸载
# 1. 停止Nginx软件
service nginx stop

# 2. 删除Nginx的自动启动

# 3. 从源头删除Nginx
rm -rf /usr/sbin/nginx
rm -rf /etc/nginx
rm -rf /etc/init.d/nginx

# 4. 再使用yum清理
yum remove nginx
# 手动安装
# (二)安装
nginx 下载地址 1 (opens new window)
nginx 下载地址 2 (opens new window)
从 nginx 官网下载安装包
本次下载 nginx-1.18.0.tar.gz
安装 nginx 相关依赖
yum -y install gcc pcre-devel zlib-devel openssl openssl-devel
将刚刚下载的 nginx 安装包上传到 linux 服务器中
/usr/local/下# 未安装 lrzsz 的,先安装:yum install -y lrzsz cd /usr/local/ # 上传 并选中 nginx 安装包 rz -be安装
# 解压
tar -zxvf nginx-1.18.0.tar.gz

# 进入
cd nginx-1.18.0

# 配置
./configure --prefix=/usr/local/nginx

# 安装
make
make install
此方法安装完成后 文件集中在/usr/local/nginx
# (二)卸载
# 1. 停止运行
/usr/local/nginx/sbin/nginx -s stop

# 2. 查找根下所有名字包含 nginx 的文件
find / -name nginx

# 3. 执行命令 rm -rf * 删除 nignx 安装的相关文件
rm -rf /usr/local/nginx
...(第二步查找到的相关 nginx 目录)

# 4. 如果设置了 Nginx 开机自启动的话,可能还需要下面两步
chkconfig nginx off
rm -rf /etc/init.d/nginx
# nginx配置
#user  nobody;

#==工作进程数,一般设置为cpu核心数
worker_processes  1;
#error_log  logs/error.log;
#error_log  logs/error.log  notice;
#error_log  logs/error.log  info;
#pid        logs/nginx.pid;
events {
    #==最大连接数,一般设置为cpu*2048
    worker_connections  1024;
}


http {
	include       mime.types;
	default_type  application/octet-stream;

	#log_format  main  '$remote_addr - $remote_user [$time_local] "$request" '
	#                  '$status $body_bytes_sent "$http_referer" '
	#                  '"$http_user_agent" "$http_x_forwarded_for"';

	#access_log  logs/access.log  main;

	sendfile        on;
	#tcp_nopush     on;

	#keepalive_timeout  0;

	#==客户端链接超时时间
	keepalive_timeout  65;

	#gzip  on;

	#当配置多个server节点时,默认server names的缓存区大小就不够了,需要手动设置大一点
	server_names_hash_bucket_size 512;

	#server表示虚拟主机可以理解为一个站点,可以配置多个server节点搭建多个站点
	#每一个请求进来确定使用哪个server由server_name确定
	server {
		#站点监听端口
		listen       8800;
		#站点访问域名
		server_name  localhost;

		#编码格式,避免url参数乱码
		charset utf-8;

		#access_log  logs/host.access.log  main;

		#location用来匹配同一域名下多个URI的访问规则
		#比如动态资源如何跳转,静态资源如何跳转等
		#location后面跟着的/代表匹配规则
		location / {
			#站点根目录,可以是相对路径,也可以使绝对路径
			root   html;
			#默认主页
			index  index.html index.htm;

			#转发后端站点地址,一般用于做软负载,轮询后端服务器
			#proxy_pass http://10.11.12.237:8080;

			#拒绝请求,返回403,一般用于某些目录禁止访问
			#deny all;

			#允许请求
			#allow all;

			add_header 'Access-Control-Allow-Origin' '*';
			add_header 'Access-Control-Allow-Credentials' 'true';
			add_header 'Access-Control-Allow-Methods' 'GET, POST, OPTIONS';
			add_header 'Access-Control-Allow-Headers' 'DNT,X-CustomHeader,Keep-Alive,User-Agent,X-Requested-With,If-Modified-Since,Cache-Control,Content-Type';
			# 重新定义或者添加发往后端服务器的请求头
			# 给请求头中添加客户请求主机名
			proxy_set_header Host $host;
			# 给请求头中添加客户端IP
			proxy_set_header X-Real-IP $remote_addr;
			#将$remote_addr变量值添加在客户端“X-Forwarded-For”请求头的后面,并以逗号分隔。 如果客户端请求未携带“X-Forwarded-For”请求头,$proxy_add_x_forwarded_for变量值将与$remote_addr变量相同
			proxy_set_header X-Forwarded-For $proxy_add_x_forwarded_for;
			#给请求头中添加客户端的Cookie
			proxy_set_header Cookie $http_cookie;
			#将使用代理服务器的主域名和端口号来替换。如果端口是80,可以不加。
			proxy_redirect off;

			#浏览器对 Cookie 有很多限制,如果 Cookie 的 Domain 部分与当前页面的 Domain 不匹配就无法写入。
			#所以如果请求 A 域名,服务器 proxy_pass 到 B 域名,然后 B 服务器输出 Domian=B 的 Cookie,
			#前端的页面依然停留在 A 域名上,于是浏览器就无法将 Cookie 写入。
      #不仅是域名,浏览器对 Path 也有限制。我们经常会 proxy_pass 到目标服务器的某个 Path 下,
			#不把这个 Path 暴露给浏览器。这时候如果目标服务器的 Cookie 写死了 Path 也会出现 Cookie 无法写入的问题。

			#设置“Set-Cookie”响应头中的domain属性的替换文本,其值可以为一个字符串、正则表达式的模式或一个引用的变量
			#转发后端服务器如果需要Cookie则需要将cookie domain也进行转换,否则前端域名与后端域名不一致cookie就会无法存取
      #配置规则:proxy_cookie_domain serverDomain(后端服务器域) nginxDomain(nginx服务器域)
			proxy_cookie_domain localhost .testcaigou800.com;

			#取消当前配置级别的所有proxy_cookie_domain指令
			#proxy_cookie_domain off;
			#与后端服务器建立连接的超时时间。一般不可能大于75秒;
			proxy_connect_timeout 30;
		}

		#error_page  404              /404.html;

		# redirect server error pages to the static page /50x.html
		error_page   500 502 503 504  /50x.html;
		location = /50x.html {
			root   html;
		}
	}
	#当需要对同一端口监听多个域名时,使用如下配置,端口相同域名不同,server_name也可以使用正则进行配置
	#但要注意server过多需要手动扩大server_names_hash_bucket_size缓存区大小
	server {
		listen 80;
		server_name www.abc.com;
		charset utf-8;
		location / {
			proxy_pass http://localhost:10001;
		}
  }
	server {
		listen 80;
		server_name aaa.abc.com;
		charset utf-8;
		location / {
			proxy_pass http://localhost:20002;
		}
	}

	server {
		listen 80;
		server_name aaa.abc.com;
		charset utf-8;
		location / {
      root   # 打包文件的路径,例/Users/x/Desktop/workspace/general/dist/test;
      index  index.html index.htm;
      try_files $uri $uri/ /index.html; # 解决 vue 路由 history 模式下404
    }
	}


}
# 注意事项
# 1. 如未开放 80 端口,需开放
# 查看已开放的端口:
firewall-cmd --list-ports

# 默认80端口加入防火墙访问白名单中:
firewall-cmd --permanent --zone=public --add-port=80/tcp

# 使用命令使其生效:
firewall-cmd --reload