Centos7搭建使用图形化界面
# Centos7搭建使用图形化界面
# 环境
- Centos版本:Centos7.9
- 图形化使用工具: vnc viewer / vnc-server
- linux图形化包: "GNOME Desktop" "X Window System"
# 安装 Linux 图形界面
# 安装
yum -y groups install "GNOME Desktop" "X Window System"

#查看当前系统的启动模式
systemctl get-default

multi-user.target # 命令模式
graphical.target # 图形模式

#修改启动模式为图形界面:
systemctl set-default graphical.target
重启reboot后生效
# 安装配置 Vnc 工具
# vnc-server
# 安装
yum -y install tigervnc-server tigervnc
# 1、设置vnc密码
vncpasswd
# 2、复制一份文件,并改名为vncserver@:1.service
cp /lib/systemd/system/vncserver@.service /etc/systemd/system/vncserver@:1.service
# 3、将文件中的<User>用你当前的用户替换
ExecStart=/usr/bin/vncserver_wrapper root %i
# 4、更新并启动vnc
systemctl daemon-reload
systemctl enable vncserver@:1.service && systemctl start vncserver@:1.service
# 5、在防火墙开放vnc端口
firewall-cmd --state
# 如果启动应该输出running
# 如果是not running,执行下面命令启动防火墙
systemctl start firewalld
# 添加端口号5901-5905
firewall-cmd --permanent --zone=public --add-port=5901-5905/tcp
# 重新加载防火墙
firewall-cmd --reload
# vnc 相关命令
# 停止vnc进程
vncserver -kill :1
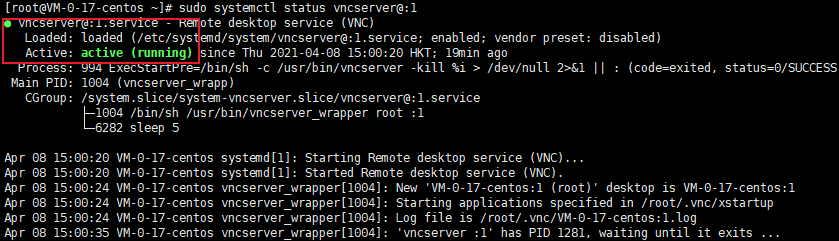
# 查看 vnc 状态
sudo systemctl status vncserver@:1
# 更新配置
systemctl daemon-reload
# 运行 vnc
systemctl enable vncserver@:1.service && systemctl start vncserver@:1.service
注意:
a、如果你不配置和启用防火墙,此时用VNC Viewer连接的话,会报:"connect:Connection timed out(10060)"错误。
b、本文是以root用户为例,如果其他用户也需要登录,那么,还需要将文件复制为
cp /lib/systemd/system/vncserver@.service/lib/systemd/system/vncserver@:2.service
同时,将文件内的%i改为2,并建立对应用户的vncpasswd。
# 一、使用vnc viewer 查看
window 上使用
vnc viewer配合vnc-server使用,下载后安装即可
vnc viewer下载 (opens new window)
安装成功后,打开 vnc viewer,在头部输入框输入 服务器地址 + 端口号,回车即可。正确显示如下

# 二、使用 noVnc 再浏览器中查看
# 安装 noVnc
yum -y install novnc python-websockify numpy

# 生成证书,会提示确认,一直回车
openssl req -x509 -nodes -newkey rsa:2048 -keyout /etc/pki/tls/certs/novnc.pem -out /etc/pki/tls/certs/novnc.pem -days 365

# 添加权限
chmod 644 /etc/pki/tls/certs/novnc.pem

# 配置浏览器查看端口
firewall-cmd --add-port=6080/tcp --permanent
firewall-cmd --reload

# 启动 noVnc
websockify --web=/usr/share/novnc/ --cert=/etc/pki/tls/certs/novnc.pem 6080 localhost:5901

# 添加参数-D 可以让websockify在后台启动
websockify 相关命令
[root@node1 novnc]# websockify --help
Usage:
    websockify [options] [source_addr:]source_port [target_addr:target_port]
    websockify [options] [source_addr:]source_port -- WRAP_COMMAND_LINE

Options:
  -h, --help            show this help message and exit
  -v, --verbose         verbose messages
  --traffic             per frame traffic
  --record=FILE         record sessions to FILE.[session_number]
  -D, --daemon          become a daemon (background process)
  --run-once            handle a single WebSocket connection and exit
  --timeout=TIMEOUT     after TIMEOUT seconds exit when not connected
  --idle-timeout=IDLE_TIMEOUT
                        server exits after TIMEOUT seconds if there are no
                        active connections
  --cert=CERT           SSL certificate file
  --key=KEY             SSL key file (if separate from cert)
  --ssl-only            disallow non-encrypted client connections
  --ssl-target          connect to SSL target as SSL client
  --unix-target=FILE    connect to unix socket target
  --web=DIR             run webserver on same port. Serve files from DIR.
  --wrap-mode=MODE      action to take when the wrapped program exits or
                        daemonizes: exit (default), ignore, respawn
  -6, --prefer-ipv6     prefer IPv6 when resolving source_addr
  --target-config=FILE  Configuration file containing valid targets in the
                        form 'token: host:port' or, alternatively, a directory
                        containing configuration files of this form
  --libserver           use Python library SocketServer engine
# 常见问题
# Timed out waiting for a response from the computer
如果以上配置没出问题,vnc也是如下图的正常运行,那么需要检查服务器的安全组策略
查看服务器的安全组策略,如果没有配置允许vnc相关端口,需配置后即可打开

如果配置了安全组还是无法访问,可以尝试执行
sudo /sbin/iptables -I INPUT 1 -p TCP --dport 5901:5910 -j ACCEPT
service iptables restart 如果没有iptables.service文件,使用yum安装一下:yum install iptables-services